Monday, May 10, 2010

Zombie Apple!


I was really, really bored and depressed after saying "goodbye" to the Raccoon today so I decided to carve a zombie face into an apple and make myself feel better by eating it. Apples are also good for keeping your immune system in check so that you do not contract the H1N1Z virus. I have to say, it was incredibly gratifying to chomp down on that fucking apple.


Stay healthy, kids.
The Rogue

Sunday, April 25, 2010

R.I.Pieces


The Ronin 2009-2010

Have fun being zombie meat, "brother"

Love,
The Rogue

Sunday, November 1, 2009

Pumpkin Smoke Bombs

The recipe I'll be giving you has colored smoke. If you want one just to try out and not have color to it here's a step-by-step tutorial on pumpkin bombs!

Pumpkin Smoke Bomb Recipe


You will need:
Potassium Nitrate (KNO3)

Sugar (C12H22O11)

Baking Soda (NaHCO3)

Powdered Dye- I buy organic brands and normally only get blue and orange because they tend to work better. Blue is a really nice contrast against the orange of the pumpkin.

Mini Pumpkin Gord

Cutting Tools- for gutting your pumpkin

Scale

Cooking Pot

Heat Source- Stove!

Fuse- These you can make or buy from a fireworks shop

Paper Towel

Safety Supplies

The recipe I've found calls for 60g KNO3, 40g Sugar, 3 Tbs of powdered dye, and a Tbs of Baking Soda. Gut your pumpkin and be sure to dry it out. You can use paper towels to absorb moisture. Make sure there is a decent hole at the top of your pumpkin. Mix your KNO3 and sugar and put it on the stove on LOW HEAT and keep stirring. If you've ever burned sugar before, you know that it'll caramelize. Your mixture will start to look like a caramel-like substance that's light brown in color. Add your baking soda and dye to the mixture and stir. Make sure its mixed thoroughly and then add it to your gutted and dried out pumpkin. Your mixture will have to set. This could take anywhere from 1-3 hours. Once dried, stuff a fuse into the pumpkin. You can use a piece of a paper towel to keep it in place.

Here's a video with pretty much the same recipe minus the pumpkin. Enjoy your smoke bombs.


Ultimate Color Smoke Bomb ! How to Make It.... - Click here for another funny movie.

Sunday, October 25, 2009

In Response To My Last Letter...

To Whom It May Concern,

I have yet another point I would like to make for you readers:

I am NOT going to teach you to make fertilizer bombs.

Yeah, they're probably useful for when the zombies attack and yes I know how to make them but these are far too potent to just experiment with. There are too many people who would want to mess around with them and all you would do is blow yourselves and everyone else around you to kingdom come. And, to be honest, I don't trust you, reader.

A few of us here at Team WeComePrepared, myself included, are from Oklahoma and are all too familiar to what fertilizer bombs can do...


Sincerely and with much disdain,
The Rogue

Saturday, October 24, 2009

Containers


Containers are certainly something to invest in. As I mentioned in the Safety Supply List, glass and stainless steel containers are the best you can have if you plan on storing the contents for an extended period of time. If you need a quick container, you can still use plastic recycled ones but I don't suggest always storing your materials in these because the plastic will eventually start to break down and contaminate your materials causing you to have to remake them and waste valuable resources.

You can go online to places like Ebay and buy some cheapo containers or you can go to a thrift store or antique shops.

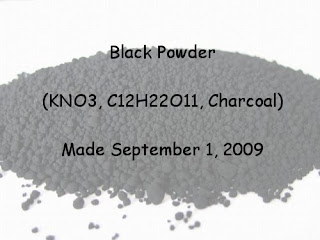
Be sure to LABEL THEM ACCURATELY. Don't just label your mixture "Black Powder" especially if you have different kinds of compounds. Here's an example:


Yes, these are both Black Powder compounds but they're still different on a molecular level. It's also important to write in your dates because the older your materials the less potent they are. It's important to label all of your containers because a lot of your materials tend to look the same (i.e. sugar and KNO3).

Be sure to store them in a dry, dark area at room temperature.

Hope this helps.

Keep safe, kids.
The Rogue
WeComePrepared@gmail.com

Black Powder Recipes


Black Powder (also known as finely ground gunpowder) has multiple uses and is relatively easy to make. It just takes patience and a utilization of your resources. You can use Black Powder to make fuses and decently powerful bombs- both of which I'll teach you how to make.

First, however, I want you to have all of the safety supplies I mentioned earlier. This powder is combustible and it'd be a shame if you accidentally burned your fingers off. The main thing you'll want to have is a respirator because the powder your using is finely ground and easy to inhale. That and in one of the recipes you'll be using Sulfer.

Recipe Number 1:

You will need:
Potassium Nitrate (KNO3)- you can order this online OR go to your local gardening center and buy stump remover.

Powdered Sulfer (S)- You can either order this online or find your local chem and teacher supply store.

Charcoal- you can either buy this or just burn some wood and collect the black charcoal.

Mortar and Pestle- You can find these pretty much anywhere. I got mine at a pantry shop and am considering getting a newer, larger one (seriously, I can fit my head inside) at the Asian Market.

Scale- you can order a decent one online or find one at a teacher's supply shop.

Container for storage

In your mortar and pestle, grind each of your ingredients into a fine powder (Trust me, grinding them beforehand makes your life a hell of a lot easier when you have to grind it later). How much of each ingredient you use is dependent on how much black powder you intend to make. I normally make a lot so that I have plenty on hand. Here are the measurements for a 100g batch:

On a scale weigh out 75g of KNO3, 15g of black charcoal and 10g of S. Mix them all in a mortar and pestle and grind them back into a fine powder- the finer the powder, the faster it will burn.

Recipe Number 2: This is an easier recipe to make on hand because it doesn't contain S.

You will need:
Potassium Nitrate (KNO3)

Sugar (C12H22O11)- this is common table sugar

Charcoal

Distilled Water (H2O)- You can buy gallon bottles of it at the store or you can make your own. I normally make my own and keep gallon jugs of it around.

Mortar and Pestle

Scale

Heat source

Skillet- I use a small cast iron one but you can use whatever you want

Container for storage

Again, here are the measurements of a 100g batch:
On your scale weigh 60g KNO3, 20g of Sugar and 20g of black charcoal. Grind each into a fine powder (in one recipe I found online, the person used powdered sugar instead of your standard granulated sugar. I've never used this but the result was just the same. It just sped up the grinding process which is probably very useful). Mix them all together in a mixing bowl or your mortar and pestle and add your distilled water. Once mixed, pour the black soup into your skillet and heat up on LOW. LOW LOW LOW. Make sure you stir to keep it from clumping up too badly or burning. The water will evaporate and you'll have powder again. Grind that back into a fine powder.

Another method is to filter your KNO3, Sugar and charcoal compound using acetone (commonly known as nail polish remover). Get a coffee filter and fold it into the shape of a funnel and place it over a beaker or glass. Spoon out some of your compound into your filer and slowly pour in the acetone. Do this for your entire batch and let the compound air dry for several days. I'd use this if you don't have a temperature controlled heat source.

Have fun blowing shit up.

Keep safe, kids.
The Rogue
WeComePrepared@gmail.com

Friday, October 23, 2009

Safety

Before I start giving you guys any recipes, I want to go over some safety precautions. These are BOMBS- I don't think I could put enough emphasis on safety.

Here's a list of things I keep around while using and making my homemade explosives:


Kitchen Gloves
I specifically use kitchen gloves because they are made of decently thick latex and cover a larger area as opposed to your standard latex gloves.

I've gotten into the habit of tying a rubber band around the ends of them to not only keep them on but to eliminate any chance of harmful chemicals falling down into them and mixing with other chemicals. Just be careful not to pull it too tight or you'll cut off circulation to your arms.

NOTE: If you are allergic to latex, invest in some decent surgical gloves. I've found some that are latex free. just Google "Non-Latex Kitchen Gloves."

Disposable Respirator
You can never have too many of these around. The chemicals you could potentially use for one of your projects can be highly corrosive and not good for you to ingest or inhale. I'd even go so far as to own a full unit respirator.This is similar to a model I have and they're certainly worth looking in to. The filters are disposable and need to be replaced every now and again. Be sure to store your filters in an air tight bag otherwise they won't last as long. Also, be sure to clean the rubber mask with an alcohol swab before and after every usage. this will increase the longevity of your respirator. I bought mine as a requirement through my college but you can buy these online and probably at hardware stores like Home Depot.Safety Goggles
Make sure you get a sturdy, close-to-face-coverage pair with shaded lenses. Since you're working with combustible materials, make sure your lenses are dark enough that you aren't going to be blinded while working. Test out different pairs to see how dark your lenses need to be- Everyone's eyes are different and have a range of sensitivities.

Other items to consider:

Glass Containers for your chemicals- Have you ever kept an old bottle of water lying around and discovered that when you take a swig of it, it tastes more like the plastic bottle than the water? That's because over time plastic starts to break down. If you keep all of your mixtures in plastic containers, your chemical compounds could change and potentially spoil. Same thing goes with metal containers that aren't stainless steel. Eventually the metal would start to break down and change the chemical makeup of your mixture. I use glass containers because they're see through and cheaper than stainless steel. If you HAVE stainless steel containers, use those because they're more durable.

Smock/Apron- I'm a painter so these become my best friends really fast. Getting chemicals on you is BAD. Don't let it happen.

Fire Blanket- Self explanatory. You can order these online.

Fire Extinguisher- See "Fire Blanket" above

First Aid Kit- You should have these around anyway if you're planning on surviving the zombie apocalypse. Keep everything from peroxide to medical tape and gauze.

Blue Shop Towels- These are basically industrial paper towels. They're sturdy ehough to be washed and reused and thus last for a really long time. You can buy these in decent sized rolls at Home Depot or at an Auto Shop.

This list will likely be expounded upon. But its late and I'm fucking tired. It's been a long day.

Keep safe, kids. Goodnight.
The Rogue